Showing posts with label Project 2 BA2. Show all posts

Friday, 24 February 2012

Mudbox Sculpt Timeline


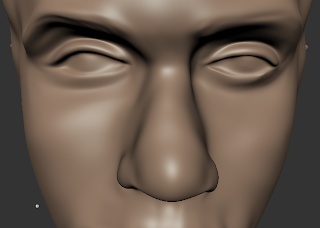
These screenshots show a time-line of my development of Sam's head. The eyes took a while to get looking OK, and I re-sized and moved them about the face several times to get them looking right. The grid technique I used with a photo of Sam helped a lot , along with the quality of the reference photographs I was using.

The mouth was especially tricky to sculpt as I found it hard to get the shape of the mouth full enough without it looking like Sam was pouting! Dom Littler helped me with some good advice on how to use the wax tool to gently build up the skin around the top of the mouth (the skin covering the top line of teeth) and from there I was able to crack the problem!

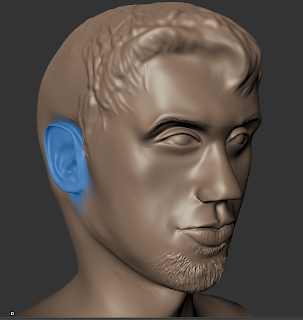
I also used the wax tool to create the hair effect on the top of Sam's head. This took a lot of time to build up gradually, stroking in the lines of hair and then smoothing the edges so that it did not appear too false. I found it hard to decide how much detail to add to the hair, as you don't want it looking under-done, but similarly you cannot sculpt in each hair as the geometry simply wouldn't be able to handle it!

The ears are blue in the lower photographs because I have frozen that area so that when I was sculpting the hair, I did not interfere with the ears - which I am very happy with.

1/7 - Facial Intro Topology - Sintel - YouTube

1/7 - Facial Intro Topology - Sintel - YouTube:

Toplogy Help

This video looks into how topology is used in animating faces in Blender.

Bay Raitt in Mirai - YouTube

Bay Raitt in Mirai - YouTube:

Whilst looking into topology and 3d modeling I found this video of Bay Raitt making a character from stretch, rigging, animating and texturing a character all in one afternoon!!!

Thursday, 23 February 2012

Anatomical References

http://face-and-emotion.com/dataface/anatomy/upperfacemusclesdetails.jsp

Clear helpful illustrations of the upper face, and eye musculature.


http://face-and-emotion.com/dataface/anatomy/lowerfacemusclesdetails.jsp


This is an image that I drew, studying from; Tom Flint, 2002. Anatomy for the Artist. 1st Edition. Arcturus. Page 40-41


This 10 minute drawing in pencil and pen was drawn when I was on the train, this man's posture and facial features reminded me of a woodland animal and so I drew him, from the reflection on the opposite window!


Wednesday, 22 February 2012

Latest Screenshots of my Headsculpt

The mouth, cheeks and hair are far from finished, but I think that the general structure of the face and the shape of the eyes is successful!

Tuesday, 21 February 2012

Friday, 17 February 2012

Gouraud shading - Wikipedia, the free encyclopedia

Gouraud shading - Wikipedia, the free encyclopedia:

Reference material for Mudbox Lecture last week. This technique of shading is the theory we will use to create our bump-map in Mudbox.

Utah teapot - Wikipedia, the free encyclopedia

Utah teapot - Wikipedia, the free encyclopedia:

The first rendered 3D image made on a computer by Martin Newell. Mark mentioned this in his Mudbox Lecture last week. It reminded me of the first animated 3D object produced by Pixar, which is used today in its opening credits - the seemingly mundane desk lamp.

Thursday, 16 February 2012

Mudbox 2009 Face sculpting - YouTube

Mudbox 2009 Face sculpting - YouTube:

Helped me realise which order I would need to build up the lips and indent the gap between them when sculpting the mouth. A little bit too quick to be really helpful if you ask me, but if you already know the basics its helpful as a speedy reference!

Wednesday, 15 February 2012

Video Tutorial: Head Sculpting Techniques

Video Tutorial: Head Sculpting Techniques:

Some helpful Modelling videos, I am looking for help with how to model the eye ball within the lids, when the eyes are open.

Sunday, 5 February 2012

Mudbox Project - Human Head Model - Sam's Ear

For my Mudbox project (BA2 - Unit 2) I have decided to model my boyfriend Sam's head. I chose Sam for two reasons; a) I live with him so have the benefit of viewing his head in real-life as well as using reference photos, and b) If I manage to 'muck' his face up, I wont lose any friends over it!

I began as Mark suggested by using a Low subdivision level to start the initial molding of the face and head. Using the grab tool I carefully shaped his jawline, nose shape, ear position, eye sockets, chin and neck/back/shoulder areas. From this point I then racked up the subdivision levels and stared work on the ears. Had I known how fiddly and frustrating this was, I would probably not have chosen them first - but I did learn a lot from this ambitious move about the way the surface of the mesh reacts to different tools, and how best to build up ridges and caverns in the skin without compromising the quality of the mesh coverage (i.e. no nasty jagged edges).


This was my first shaping of the ear, trying to define edges, and the shape of the outer lobe 'overlap'

This is the ear almost finished. It took about an hour of building up and taking away on the mesh to achieve these pronounced ridges and dips. I then went on to finish the edges and create more of a separation of the ear from the head which also required a lot of smoothing.

Here are some screenshots of the ear from other angles to show its formed 3D shape.


From this point, once I was happy with the initial sculpting of the ears, I then went on to starting to work more detail into the facial features;
I am quite happy with the brow line, but his nose mouth and chin still have a long way to go!
I am thoroughly enjoying working with Mudbox, as frustrating and tedious as it is at times!


Saturday, 4 February 2012

Mudbox Practical 1

To get rid of the grid; Display => (Uncheck) Grid

Alt+left click => rotate
Alt+middle button => zoom/move

Hold B on the keyboard for brush options.
Hold M on the keyboard to adjust strength hotbox options.
Hold spacebar for hotbox menu.

W = wireframe of mesh view toggle (underlying geometry)

Shift + D = up a level of subdivision.

Page Up / Page down buttons to cycle between subdivision layers.

Hold shift whilst drawing to activate smooth tool and smooth your brushwork.

Hold control whilst drawing to invert the tool you are using eg carve into the mesh rather than pull out of it.

Use stamp image => texture on the surface. When putting down texture you need to consider the rotation and spacing options of the stamp as well as the strength of the stamp into the mesh surface.

Brushstroke option ; smoothes out the lines you draw so to eliminate wobbles in your curves. ( stick to a value below ten ).

Build up ; ( emboss surface ) good for adding clothes or armour.

Flood ; will add an extra layer of clay to everything on the model.

Wax ; will not build up as much when strokes cross over each other (as sculpt).

Sculpt ; builds up when strokes cross over each other.

Foam ; good for adding things like hair or beards base layers ( quick to add a built up area )

Tip:

Be sure to get the right general shape of the face/skull before you go up a layer of subdivision.

Remember to use the Mirror X axis tool to keep the symmetry in the face until you get down to the a symmetrical details of the face.


Mud box Lecture 1

Notes on Mondays lecture;

Topology - study of curves ( for us it will be specifically in the facial features)

You will be marked on everything. Tutors want to see a process of events and attempts, save everything, screenshot everything and try to blog all you attempts be them failed or successful.

Digital modelling is referred to as Polymodelling.

There are two types of sculpture;
Subtractive sculpture - like a marble sculpture where you start with a large block and you sculpt into it removing layers to reveal your design.

Additive sculpture - like a clay sculpture where the sculptor can add extra material and build up from a base form.

In Mudbox you are merely surface sculpting, you are only manipulating the surface layer of a mesh which is one dimensional. Another form of digital sculpting is Volumetric Sculpting which involves 'Voxels' which are volumetric pixels ( pixels which have been given mass)

Quick notes;
Adjust the resolution of the model by subdividing the surface polygons. This also adds in layers of sculpting.

Shift + D = subdivides the surface and goes up a layer ( adding pixels ) and then you use Page Up and Page Down to navigate between the layers.

W toggles the Wire frame visibility.

Make sure you save regularly because the file is large and Mudbox has a habit of crashing when you are using a low end spec computer. You will lose you work if you haven't saved and this happens.

If you pull the geometry too far on Mudbox, when the model is in a low polygon layer or indeed any layer it wont be able to take it and the shape will be heavily distorted. Therefore Mudbox is not the ideal package to use for fantastical sculpts.

Symmetry can be toggled by the 'Mirror X' option in Brush Settings. This allows you to set Mudbox to mirror your sculpting on one side with the other. A great time saver.

You can add layers like in Photoshop but unlike in Photoshop they are linked through a hierarchy. Parent child relationships as seen in Maya. Therefore every change in the base layer will effect the layers below it.

Friday, 6 January 2012

Mudbox Escapades 1


My initial playing with Mudbox having just installed in on the new laptop. I admit, I have no real clue of what I am doing, but I am certainly enjoying playing around with the different tools I can use. I hope that by messing around today and this weekend, I'll have a better idea of whats going on when I have my first induction.

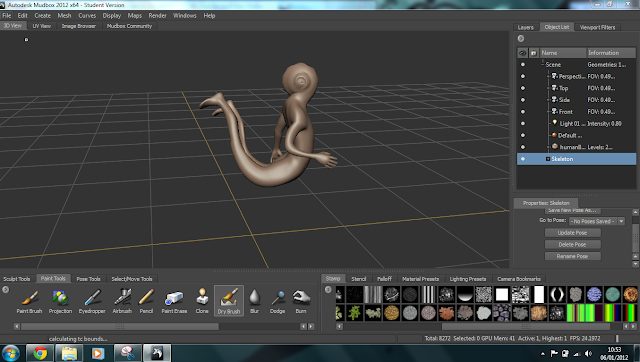
 Here I was playing around with the "Create Joint" and "Pose" potions. These caught my eye after Mark taught us about Arc movements in animation. I have a feeling that Mudbox is the program you build the object in and Maya/3Ds Max is the program you animate said model in....

I managed top achieve the attractive snail-shell head look from placing a 'joint' on the whole body bar the head, and then proceeding to wind it around the pivot point. Quite an irresistible chap...

Robin Silcock

I am a Second Year Games Art and Design student at Norwich University of the Arts. After exploration of a number of roles in my first year, I am now looking to graduate as a 3D Artist with applicable skills in Maya, Mudbox, ZBrush and Photoshop. I understand that my skills in this field are not there yet - but I aim to achieve this goal through consistently working through the programs in my University and Personal Projects. I love to be busy - I have always had a lot of things on my plate since the age of 7 where I successfully balanced school with Ballet, Tap, Horse-Riding, French, Piano and Singing Lessons! In the same fashion, my university schedule is just as hectic and varied; I am a Peer Mentor to first year students, Student Rep for Second Year, and President of the Enterprise Society. Like I said, I love to be busy! I am a Games Hippie - so to speak - I believe that Games if designed and harnessed in the right way, will be able to help solve many of the global issues we have today - even if it starts off in a small way. Just look at the positive effects that Facebook and Twitter have already had... When navigating my blog;
  • Works in Progress - This section is a constantly running account of all my current projects - personal and for university. It will contain reference images and website links and sometimes less than coherent posts, so be prepared!
  • Finished Pieces - This is where you will find my more polished artwork. Looking for help with Maya? Check out the posts tagged "Maya How-To's"