

Showing posts with label Project 1 BA3. Show all posts
Showing posts with label Project 1 BA3. Show all posts
Thursday, 17 May 2012

Tuesday, 1 May 2012

Monday, 16 April 2012
Google SketchUp Quick Concept
I have decided my design will be a combination of these two doorways mainly. I will be using the carved door panel idea from the image on the left (bluedoor) and the stone archway design on the right to surround the door. I am unsure as to whether I will include steps up to the door as few in AC2 feature steps (for obvious gameplay reasons) yet several doors of this style in my research included steps also.


This image below explains how I went about creating the simple archway shape in Google SketchUp in order to quickly see my door design take shape. These notes are not professionally finished as I intend them to simple be an Aide Memoire for when I look back on this project.

Below are some screen shots of my work in SketchUp. They are chronological and show my development;
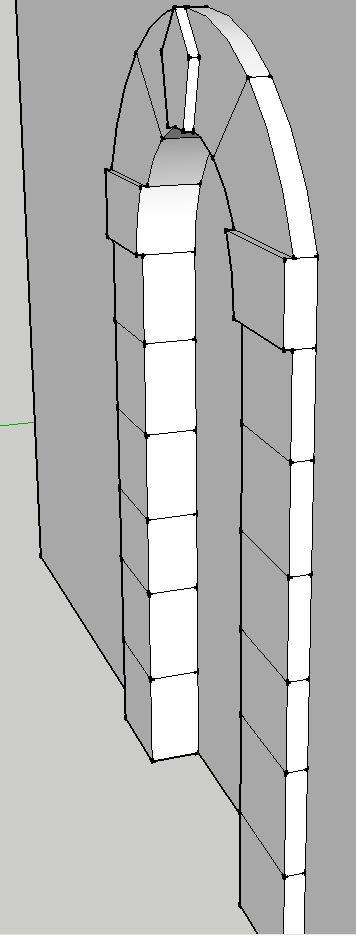
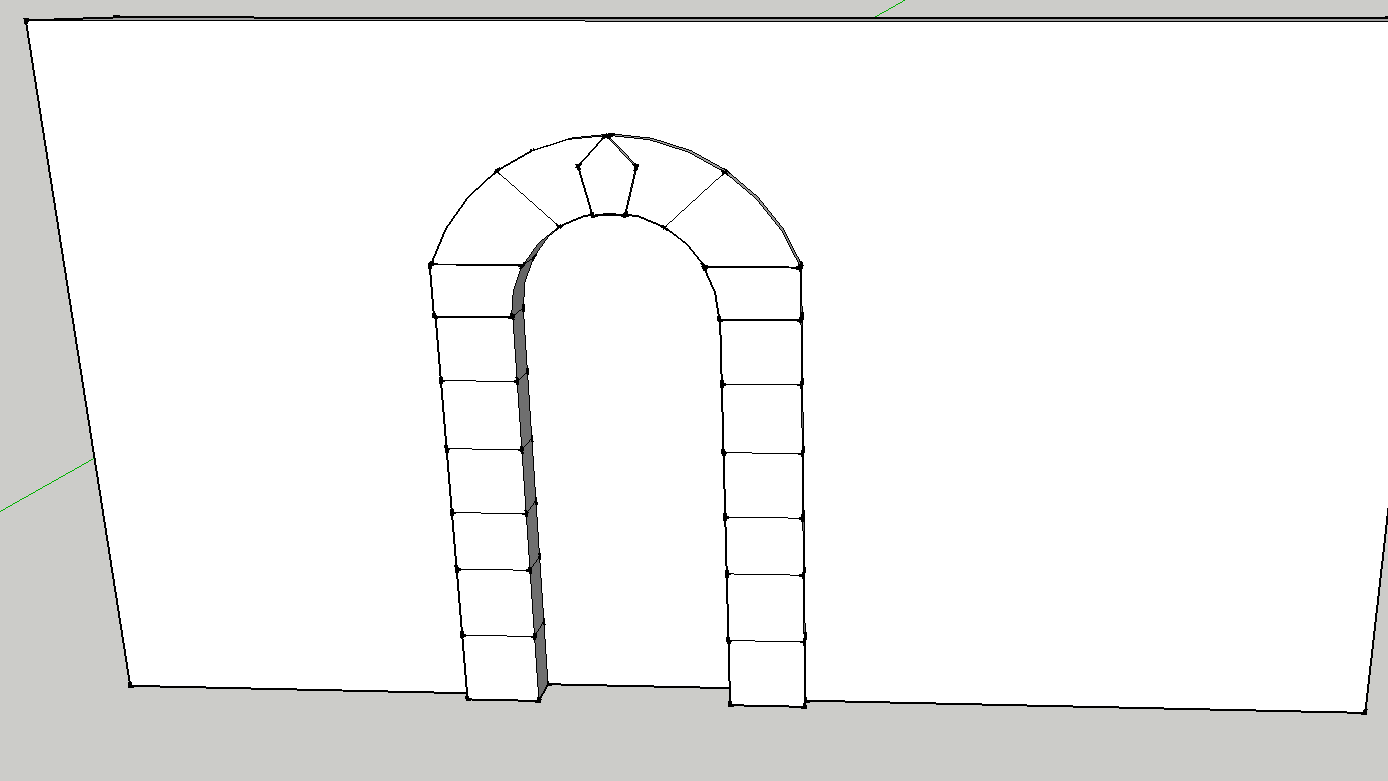


Here I am using the extrude tool to create a raised edging as featured in the doorway photographs shown above.
Maya Door Modeling - Attempt 1

I started to have a go at modelling my design by using the Booleans tool which is found under the Edit Mesh heading. I learnt about this 'cookie-cutter' technique from Mark's lecture on Monday and was eager to try it out in order to create my archway. I started by using a rectangle to cut out the door section from the wall.

To cut out the section you need to first select the item you want the shape to be cut from and then select the item you want to use to cut with. In this case the cutter is the smaller rectangle which will cut from the wall a void which is equal in shape and size to the cutter.
2 Notes to remember;
- to select multiple objects in maya you need to hold down the Shift key
- the cutting object needs to intersect all the way through an item if you want a hole going all the way through (as shown above). If you do not do this you will cut through one side of the shape, and leave more of a dent as the other side of the shape will remain untouched. That said, this technique can create some interesting results, so it is not the wrong way at all - if that is what you intended!

I then proceeded to use a cylinder to cut out the top half's arched shape, and deleted the segments that I didn't need. (see below)


Above shows how you can access the Boolean Tool, and the option you need to use is Divide. After using this I was left with an almost perfect archway.

I then noticed that my arch had two little spikes where my geometry didnt match up. So I used the Merge Vertices tool located in the Mesh Menu to get rid of these!


Sunday, 15 April 2012
Reference Images for Doorway Design
These first three doors are from Venice and the surrounding area and unlike the others below their arched section features an eastern style point to it, and even the more domestic doorways are still embellished with carvings. Venice being a merchant town, it was very prosperous in the renaissance period and so a lot of its original architectural features remain today from that era.


The pictures below are taken of Florentine doorways. Florence showcases a range of simple square doorway designs, to elaborate arched doorways. However these doorways often feature a glass panel in the arch section of the doorway which is decorated in cast iron.


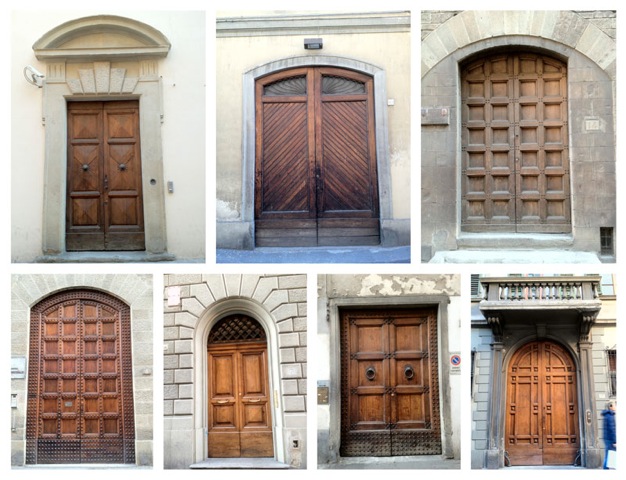

The doorways below are from Rome. All three of these styles shown are seen in the game AC2 and after playing the game, its great to see how accurate their designs are. This level of detail really aids the games excellent knack to set a scene and build the right atmosphere for the time period and location of the game. You know your are in Italy for many reasons when you play AC2, not just the sexy accents..... ;)


Websites which these images came from are numbered below, the pictures are numbered from the start of the post to this point 1-12 respectively.
1 http://images.fineartamerica.com/images-medium/italy-venice-door-yvonne-ayoub.jpg
2 http://thumbs.dreamstime.com/thumblarge_500/1272843204fSmmPM.jpg
3 http://commons.wikimedia.org/wiki/File:Venice_Houses_02.jpg
4 http://en.wikipedia.org/wiki/File:Florence_Door.jpg
5 http://www.flickr.com/photos/28540127@N05/3924957875/
6 http://technicalecstasy.org/italy.html
7 http://architrixstudio.com/blog/front-door/
8&9 http://www.housenumbers.ca/46.html
10 http://www.shutterstock.com/pic-61636321/stock-photo-rome-italy-old-door-italian-architecture-detail.html
11 http://www.shutterstock.com/pic-61636321/stock-photo-rome-italy-old-door-italian-architecture-detail.html
12 http://www.shutterstock.com/cat.mhtml?lang=en&search_source=search_form&version=llv1&anyorall=all&safesearch=1&searchterm=florence+door&search_group=&orient=&search_cat=&searchtermx=&photographer_name=&people_gender=&people_age=&people_ethnicity=&people_number=&commercial_ok=&color=&show_color_wheel=1#id=95870044
Continued Research Into AC2 Doors

This first image is one I found showing the model meshes for two main featuring characters out of Assassins Creed Brotherhood. It is interesting to see how quad and tri's are used in the character topology, and how this translates from model to rendered character. I remember Mark explaining how planes in Maya can only be seen from certain angles as they have no 3D value - you need to give a surface mass in order for it to be visible from all sides, not matter how thin you decide to make it. A similar effect is seen in Mudbox when you try and view your sculpt from underneath, it has a hole going through it as the sculpt is only a plane which has been modified in shape, it is not a solid shape like a bust.
This 'see-through' phenomenon happens in almost all games as it is easier (and quicker) for a game to run if the characters and scenery have as little information to load as possible. For example when you are playing a game and the camera appears to go through a wall, and the wall half-disappears or where a characters clothing will sometimes not be in view depending on which angle you aim the in-game camera. I find all of this info-trivia very interesting as I had personally always wondered what the hell was going on when such a thing happened in my game!

Here we have a typical shop/storage doorway in Assassins Creed 2 (Hereafter AC2)
I have noticed that the doorways in the game( which cover the areas of Florence, Rome, Venice and Tuscany) encompass two main design styles; the arched doorway and the squared doorway. Both doors feature wooden paneling if they are for the home, and if they are for storage etc they have this studded finish to them.


Monday, 2 April 2012
Assassin's Creed 2 Door Research
Assassin's Creed 2 - Dev Diary #6 - YouTube:
This is a development diary from Ubisoft which focuses on the architecture featured within the game. The database within the game features brief backgrounds to the architectural buildings of note, adding a further dimension to the game.
I have noticed in my research of the game that archways and ornate plaster work feature heavily among most doorways featured in the game. There is often a border of decoration around a doorway - this decoration will add interest to the sculpt/model that I create.
http://www.youtube.com/watch?v=Df8irXxj3zw
http://www.youtube.com/watch?v=TrYIdE2RT4k
The screenshots below were captured from the above videos, and show the trends aforementioned.


This is a development diary from Ubisoft which focuses on the architecture featured within the game. The database within the game features brief backgrounds to the architectural buildings of note, adding a further dimension to the game.
I have noticed in my research of the game that archways and ornate plaster work feature heavily among most doorways featured in the game. There is often a border of decoration around a doorway - this decoration will add interest to the sculpt/model that I create.
http://www.youtube.com/watch?v=Df8irXxj3zw
http://www.youtube.com/watch?v=TrYIdE2RT4k
The screenshots below were captured from the above videos, and show the trends aforementioned.


Monday, 19 March 2012
Martin Deschambault - AC2 Concept Artist

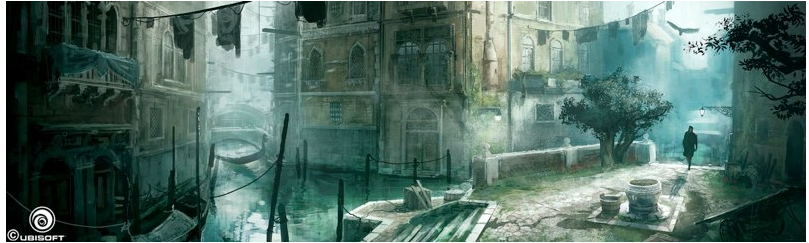

In Deschambault's work you again see the theme of arches and panelling in the doorways depicted for Assassins Creed 2. Even the simple barred door in the first image rises to a point in an archway. A lot of the more affluent doors include decorative paneling as part of their design; a popular European feature at the time.
Research into Assassins Creed 2 Artwork - Desmettre
Maxime Desmettre - Concept Artist for Assassins Creed 2


http://www.maxisland.net/MaxIsland/MI_Pro/AC2_Page01.jpg

http://www.maxisland.net/MaxIsland/MI_Pro/AC2_Page02.jpg

http://www.maxisland.net/MaxIsland/MI_Pro/AC2_Page03.jpg

http://www.maxisland.net/MaxIsland/MI_Pro/AC2_Page05.jpg
Maxime's drawing style is exactly what I love about concept artwork. I could look at these images all day and not tire of their evocative use of light and mood-setting colour palettes. Even the painty backgrounds to the working sheets complement the areas of focus beautifully. In my preparatory work for my door design I would love to try to emulate this same quality style in my own concept work.
As you can see from Maxime's work, the architecture featured in Assassins Creed 2 is heavily based on archways. They are used in windows and doors and can be seen in grand and humble abodes alike.

http://www.maxisland.net/MaxIsland/MI_Pro/AC2_Page07.jpg
The top and bottom images are my particular favourites amongst the collection. Their use of bright lime greens to depict the rolling countryside of Tuscany reminds me of a holiday I spent there several years ago.
Modeling from Image Planes
As with all new Maya projects you need to go through the process of creating a new project before you start anything.
File> Project Window> New Project.
Then you need to make sure that this new project is the one set for Maya to use;
File> Set Project> companionCube
Every time you open Maya you need to go through the process of setting the project and then opening the Scene. This means that you will always be accessing the correct file, and that Maya will always have the relevant information to hand such as paints, textures, and reference models.
Then you need to save a blank scene under your filing pattern; _000.
File> Save Scene As... > companionCube_000
Once you have Maya prepared and ready for action, you now need to make sure that the image of the cube is in the correct folder within your project folder hierarchy. The reference image of the cube should be saved under;
Projects> companionCube> SourceImages

A quick check of the settings should look as follows; centimetres, degrees, and NTSC(30fps).
Hit save.
With a quick hit of the space bar, you change your View from one panel to 4 and from this you can import your image onto each of the 3 planes.
View> Image Plane> Import Image...
Import your cube image onto all 3.
Hit Save.


Once this is done, you can start to build your cube. Insert a cube and scale it to the right size according to the 4 angled views. This value should be 26.4cm on height, width, and depth.
Quick notes:
Maya Selects everything it can, so make sure that you check that all the vertices you want are highlighted and that you haven't selected things you didn't want to. For example when selecting a corner on one side of a cube, Maya could also select the opposite side of the cube also.
To help with this you can select camera based selection rather than world based selection. This is found by double clicking on the move tool and checking the camera selection box.
It is worth noting here, if not already mentioned in my previous Maya posts, that you can access more options and settings for each tool in Maya quickly by double clicking it's icon, or by clicking the little box next to it in the menu.
Now, to start on the cube.
Create> Polygon Options> Cube
This allows you to adjust the size and dimensions of the cube before it is inserted, and also numerically after it has been inserted into the world.

Then click in the left hand menu > pCube1 > highlight H+W+D to edit these attributes.
You can also add levels of subdivision in the cube, effectively adding to the geometry. It is worth remembering however that;
To extrude the cube outwards you need to first use these values;
Edit Mesh > Extrude
Extrude Options > Offset value of 1.
Edit Mesh > Keep Faces Together needs to be checked.

Make sure you only select the 4 faces you wish to before you hit Extrude.
If you wish to repeat an extrusion you can hit the letter G on your keyboard - this repeats any adjustment to the geometry you last did, to the new selection. (Note: this may not work for all adjustments)
After extruding the edges of the cube , you need to;
Select Edges > Edit Mesh > Bevel.
For the first extrusion you need to have an Offset value of 1 and a Thickness of 0. For the second extrusion, you need an Offset value of 0 and a Thickness value of -0.5.
File> Project Window> New Project.
Then you need to make sure that this new project is the one set for Maya to use;
File> Set Project> companionCube
Every time you open Maya you need to go through the process of setting the project and then opening the Scene. This means that you will always be accessing the correct file, and that Maya will always have the relevant information to hand such as paints, textures, and reference models.
Then you need to save a blank scene under your filing pattern; _000.
File> Save Scene As... > companionCube_000
Once you have Maya prepared and ready for action, you now need to make sure that the image of the cube is in the correct folder within your project folder hierarchy. The reference image of the cube should be saved under;
Projects> companionCube> SourceImages

A quick check of the settings should look as follows; centimetres, degrees, and NTSC(30fps).
Hit save.
With a quick hit of the space bar, you change your View from one panel to 4 and from this you can import your image onto each of the 3 planes.
View> Image Plane> Import Image...
Import your cube image onto all 3.
Hit Save.


Once this is done, you can start to build your cube. Insert a cube and scale it to the right size according to the 4 angled views. This value should be 26.4cm on height, width, and depth.
Quick notes:
- Attribute Editor is toggled by Cntrl + A. From here you can also add in new layers.
- Hold right click + drag the mouse to reveal selection options. From these options you can choose to highlight/select from vertices, edges, faces, etc.
- Cntrl+Drag and Cntrl+Shift+Drag can be used to select items.
- If items are not attached to a layer; select them and right click on the layer > Add selected objects to Layer.
Maya Selects everything it can, so make sure that you check that all the vertices you want are highlighted and that you haven't selected things you didn't want to. For example when selecting a corner on one side of a cube, Maya could also select the opposite side of the cube also.
To help with this you can select camera based selection rather than world based selection. This is found by double clicking on the move tool and checking the camera selection box.
It is worth noting here, if not already mentioned in my previous Maya posts, that you can access more options and settings for each tool in Maya quickly by double clicking it's icon, or by clicking the little box next to it in the menu.
Now, to start on the cube.
Create> Polygon Options> Cube
This allows you to adjust the size and dimensions of the cube before it is inserted, and also numerically after it has been inserted into the world.

Then click in the left hand menu > pCube1 > highlight H+W+D to edit these attributes.
You can also add levels of subdivision in the cube, effectively adding to the geometry. It is worth remembering however that;
- When you add geometry in Maya, you need to make sure you don't take away geometry after you have changed the object for example it's dimensions or scale. This will break the geometry.
To extrude the cube outwards you need to first use these values;
Edit Mesh > Extrude
Extrude Options > Offset value of 1.
Edit Mesh > Keep Faces Together needs to be checked.

Make sure you only select the 4 faces you wish to before you hit Extrude.
If you wish to repeat an extrusion you can hit the letter G on your keyboard - this repeats any adjustment to the geometry you last did, to the new selection. (Note: this may not work for all adjustments)
After extruding the edges of the cube , you need to;
Select Edges > Edit Mesh > Bevel.
For the first extrusion you need to have an Offset value of 1 and a Thickness of 0. For the second extrusion, you need an Offset value of 0 and a Thickness value of -0.5.
Monday, 12 March 2012
Door/Window Study for Maya
I have been asked to study an Architectural style from a game of my choice.
I need to;
Think about where it is set.
When it is set.
The cultural influences at the time.
The historical influences at the time.
Is it realistic or futuristic?
A seriously plotted game, or is it for casual play?
I need to design something which would fit into that world. Create concept art and design drawings to show how it works as an object. You will then do some orthographic drawings of a doorway or a window. Why you have designed it the way it is. This needs to fit the game aesthetic.
I need to;
Think about where it is set.
When it is set.
The cultural influences at the time.
The historical influences at the time.
Is it realistic or futuristic?
A seriously plotted game, or is it for casual play?
I need to design something which would fit into that world. Create concept art and design drawings to show how it works as an object. You will then do some orthographic drawings of a doorway or a window. Why you have designed it the way it is. This needs to fit the game aesthetic.
Definition- non destructive pipeline.
Non destructive pipeline: your work flow treats items as assets which will be reserved at stages throughout the pipeline so that people can go back and rework things with new ideas and priorities.
Subscribe to:
Posts (Atom)